Thread tension is a delicate issue, different for sewing machines, embroidery machines, and sergers. If you own a basic sewing machine, it is advised that while you can try to adjust the bottom and top tension, don’t. In most cases basic sewing machines are well balanced and only minor top thread tension adjustments are necessary. Sergers must be adjusted constantly depending on the thread, the stitch, and the fabric being used. In addition, there are four separate threads to adjust and you can have different thread types for each. With sergers, the most expensive machines automatically adjust your tension based upon the type of stitch you are doing, for the rest of us we keep a handy notebook full of our trusted settings. Embroidery machines are a bit in between; not as intensive as a serger, but not as easily ignored as a sewing machine. This is especially true if you use your machine for sewing as well as embroidering because you are required to switch back and forth between the sewing setting and the embroidery settings.
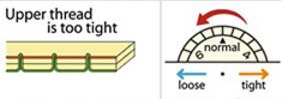
So, you know that dial with the numbers on it on the top of your machine? Mine looks like this

On an embroidery machine, this is your top thread tension control. You don’t want to touch it? It works most of the time? Be brave, write down your “most of the time” settings, gird your loins, it is time to touch the dial.
How thread tension works:
For all sewing machines, there is a top thread and a bottom thread (sergers simply have two sets). The needle inserts the top thread and the bobbin rotates the bottom thread around the top thread creating a stitch. Seems simple enough, if it was we wouldn’t be in this mess to begin with right?
The Top Thread:
The top thread adjustment is mostly easy to adjust and is an essential adjustment if you are embroidering.
I’ve tried to find a good conceptual image of a thread tensioner, and I’m sure someone somewhere has a fantastic drawing of it, but I can’t find it. So, I will have to explain with my words… sorry for what is to come.
The top thread tensioner has multiple designs, but when I conceptualize how it works I think of two plates, these two plates are being pressed together with springs and the pressure is controlled by the dial. The higher the number on the dial, the higher the tension is on the thread between the plates, the lower the number the lower the tension is.
The higher the tension, the less thread per stitch, and the lower the tension, the more thread per stitch. This does not affect your stitch length, but rather how much thread is unwound from the spool. If your tension is too low you may see tangles or excess loops of thread. If your tension is too high, the thread will break. You may also see your needle bending in between stitches.
The top thread has two states, the open state is when the pressure foot is up and the two plates have been pulled apart, and the closed state is when the pressure foot is down and the plates are being pushed together.
If you do not thread the machine in the open state or you try to operate the machine in the open state, then the thread will not be tensioned at all. This will lead to snares and a mess in your bobbin.
When the pressure foot is up, the tensioner is open. This means that thread will easily fall into the channel and will properly lay flat. Sometimes giving the thread a gentle tug down while holding the thread at the spool will ensure that the thread goes all the way into the tensioner. If you use a serger, there will be a distinct drop of the thread moving into the tensioner when you give the tug (this is an important step for all sergers. If you are serging and not giving each thread a good tug into the tensioner then you probably do not have tension on your thread.). If you don’t thread the machine with the pressure foot up then the thread will not enter the tensioner.
Once the pressure foot is put in the down position, the tensioner engages into the closed position and applies tension to the thread. If you do not sew with the pressure foot down, then the thread is not under pressure. I don’t care if you are sewing over six layers and there is no appreciable difference between the foot being down and the foot being up, if the foot is up, then the tensioner is not engaged.
What you will see:

If your thread is correctly tensioned, then you should see something like this…. neither thread is visible from the opposite side, and there are no loose threads.
If the top thread is too tight and the bottom thread too loose, the bottom thread will show through to the top of the stitch and since we mostly use either black or white nylon or polyester thread for our bottom thread, that would mar our final product. Loosen the top thread by turning the wheel so that the lower number is visible.

If the top thread is too loose or the bottom thread is too tight, you will waste a lot of your vibrant top thread and add unnecessary thickness and rigidity to your project. In some cases, top thread that is excessively too loose or is not tensioned at all can cause a snare. In embroidery, you want to be at a lower thread tension but sometimes having too loose a thread will cause loops in your stitching. This doesn’t look clean and can make or break your project. Turn the dial until a higher number is visible.
If the top thread is too tight and the bottom thread is too tight, then you will result in a recurring broken thread issue. In this case depending on the issue, you may need to get your machine serviced to balance out your needs.
For most sewing machines, the bobbin is adjustable, but most service technicians recommend not adjusting the bottom thread unless you are very comfortable with it or are happy to bring the machine by to be readjusted by a professional when you can’t get it working again.
Oh Shit! You have a thread tension problem:
What do thread tension problems really look like? I mean drawings are all well and good, but what the heck does one really look like? I’m glad you asked…
Oh Shit #1: The Snare…
What is a snare? That is my name for them. I’ve read bird’s nest, bunching, tangles…etc. Doesn’t matter what you call it, it looks like this.

This is a clear indicator that your top thread was not in the tensioner at all. The Top thread basically didn’t leave the bobbin for multiple stitches and the needle kept trying to make another stitch. This results in the bobbin becoming horribly tangled. There are supposedly other reasons for this to occur, but the majority in my experience is because the top thread was threaded with the pressure foot down. If you want to read more about how you are getting snares (bird’s nests) then check out this blog written by Marina Belova in the post “What is Bird Nesting?”
Most of the time the snare is sucked into the throat plate of the machine and it wraps around the bobbin. The embroidery arm stops moving, the machine insists there is a broken thread (but you don’t see one). DO NOT CONTINUE TO EMBROIDER!!!! If your machine is insisting there is a broken thread but you don’t see any broken thread, pull the hoop off the embroidery arm and re-thread everything. Then breathe a sigh of relief because you just saved yourself an hour of work.
If the worst happens and the machine is completely stuck, cut the fabric free as gently as is possible and clear away the mess afterwards. Follow these steps to recover from a Snare.
~ Step #1: Gently cut the fabric free.
~ Step #2: Remove the hoop and remove any loose stitches from your design.
~ Step #3: Dismantle the bobbin case. Clean everything, inspect for damage.
~ Step #4: Replace the needle. The hoop was trying to move, the needle had excess tension on it, it probably bent. Reassemble and re-thread bobbin.
~ Step #5: Re-thread top thread with the pressure foot in the up position!
~ Step #6: Return your hoop to the machine
~ Step #7: Turn the embroidery machine off. OMG!!! Right, you just lost your position in the layer! You’ve already lost the position. If you try to just re-thread and continue from here the rest of your design will be out of alignment from where you started. You must restart your machine so that the embroidery arm can return to its factory settings.
~ Step #8: Resend the layer from your computer to the machine.
~ Step #9: Fast forward to the point where the snare started (or at least to the last functioning stitch. Sometimes that is stitch #1) How? On the Singer XL-420 Look at the two buttons above the start button on your sewing arm. The second button from the top is the fast forward button, the one just below is the reverse button. If you press the fast forward and hold until you hear a beep, the machine will continuously fast forward until you push the start/stop button. Check your Owners Manual for your specific instructions.
~ Step #10: Holy Shit this took forever right? you have finally gotten back to where you were before the SNARE FROM ALL HELL. Hang in there, you almost have it working again. Hold the end thread securely and start your machine. Keep it slow and only increase the speed once you are sure the tensioner is engaging properly.
Oh Shit #2: Why is the bottom thread showing in my final design?!
This happens to my mother all the time, the darker bottom thread keeps showing up on your design. Maybe it is an unexpected shadow, or your lettering isn’t crisp and clean.
In my experience, you notice this issue most when you are doing satin stitches. If you are concerned that this is your problem then run a test strip with simple satin stitch designs. You will quickly see the problem on the back side of the design.
Too much top thread tension looks like this:
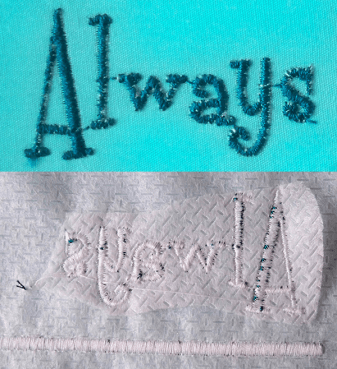
Notice how you mostly notice the problem on the design side. This is probably the worst problem you can have because it will show up on your final product.
Just the right amount of thread tension looks like this:
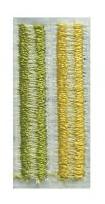
Perfectly balanced in every way.
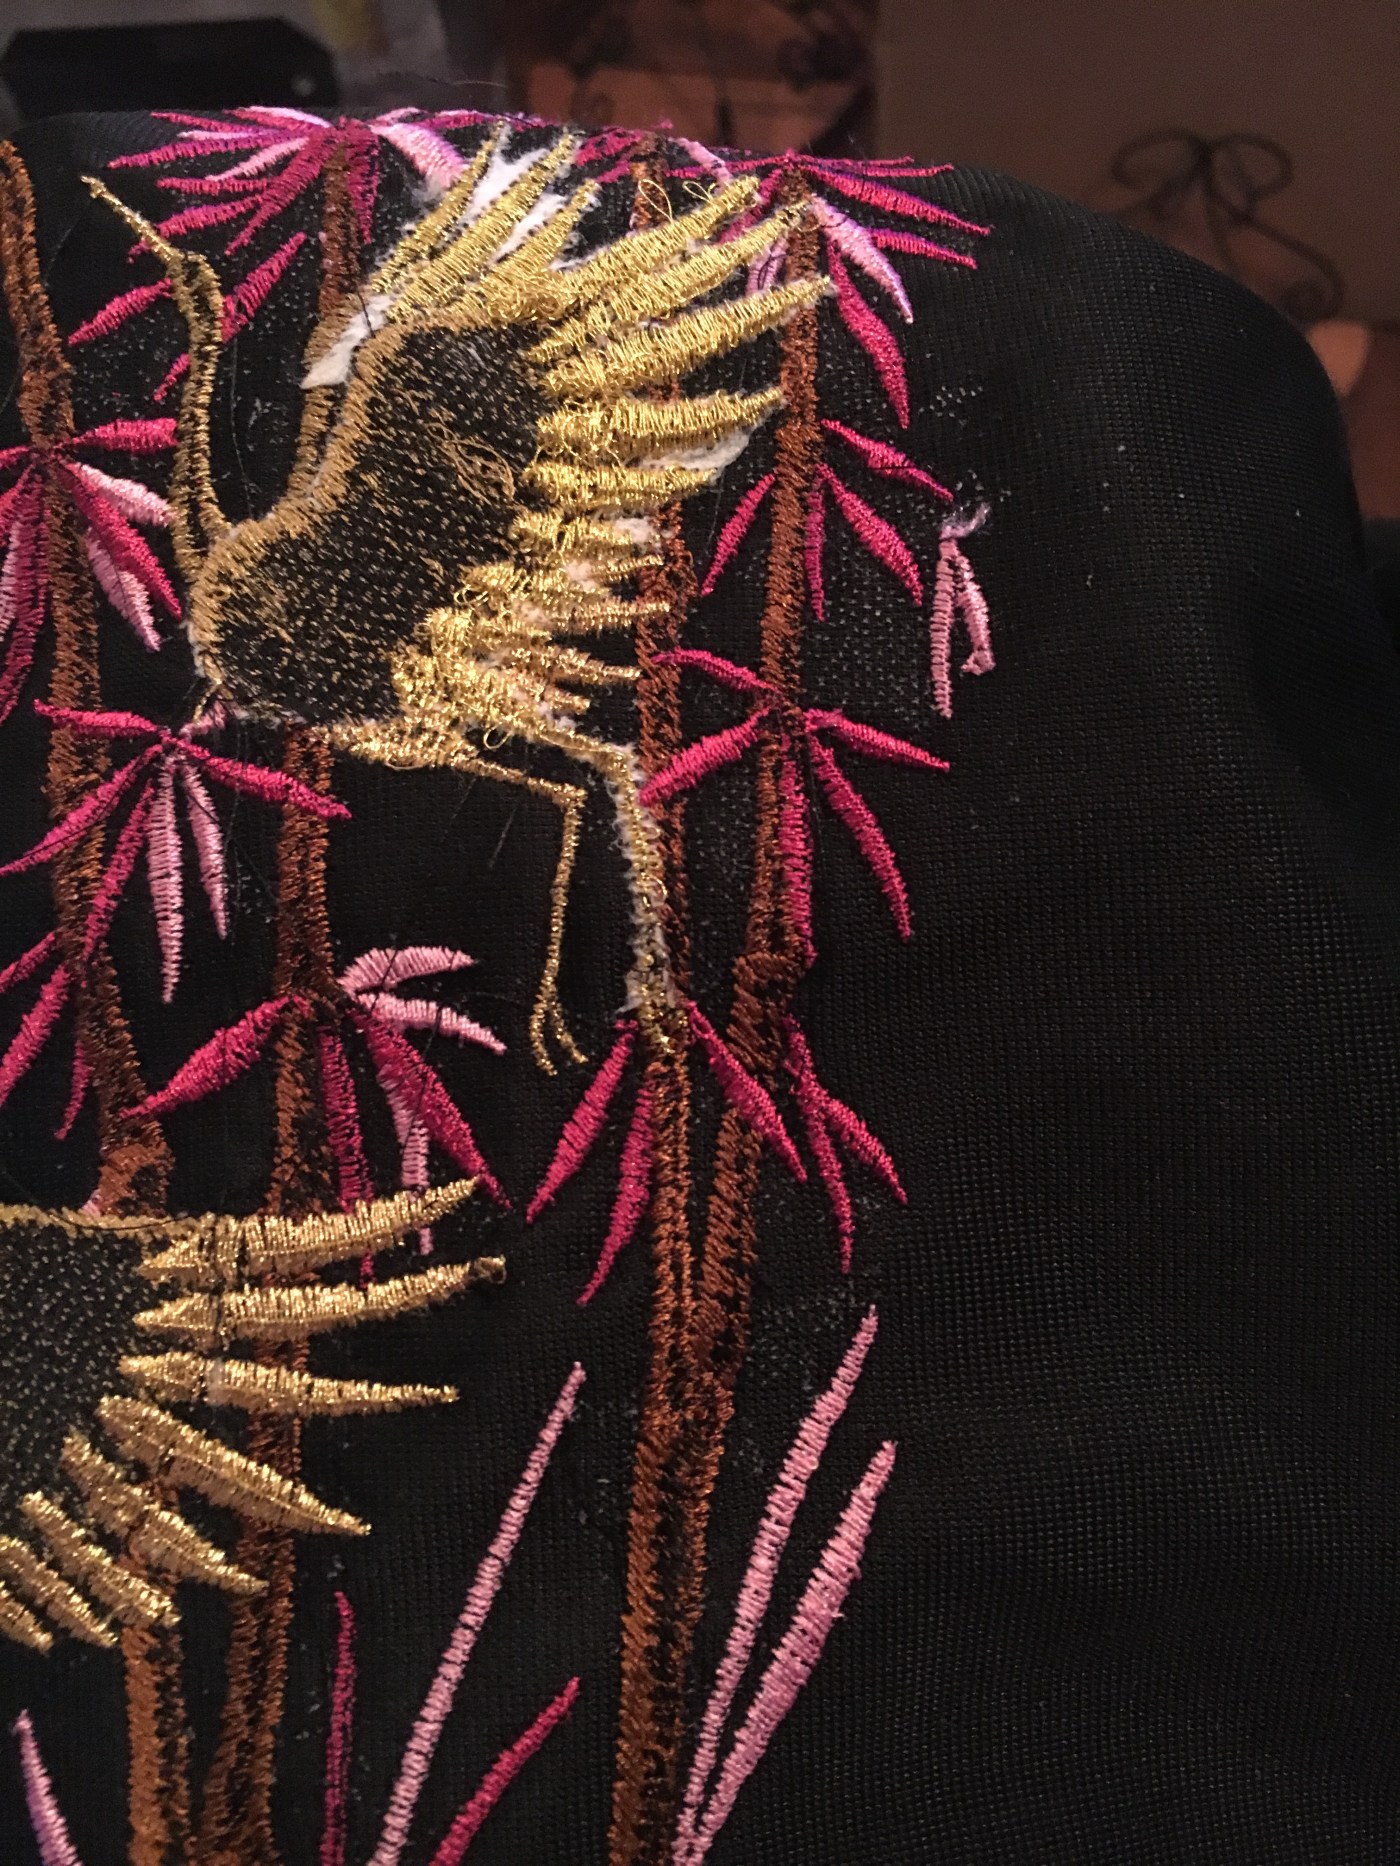
And too little top thread tension looks like this:
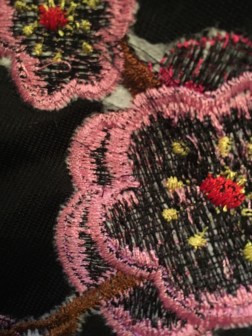
This is from one of my projects. Because the thread had a bad habit of breaking I had loosened the top thread tension down to the 3 or so. This let the tension to be way too loose and the bottom thread is barely visible. This lead to a very rigid final product.
Oh Shit #3: Why is my stitch so rigid?
This happens generally when you have too much thread in one area. There are a few causes for this so read on and check which one may apply to you.
a.) You are not using the proper bottom thread.
- At first I didn’t know you weren’t supposed to use the same bottom thread as the top thread. Many of my first designs were stiff and wrinkled because the design was too heavy for the fabric.
- Always use Nylon or polyester thread for your bottom thread. It is thinner and stronger.
- The reason we use Rayon thread for the top thread is that rayon takes color better than many other synthetic fibers. And Rayon is strong enough not to break in the machine. The nylon or polyester fibers take black and white okay, and are best used in the bottom stitch.
b.) You shrank the design
- When you shrink a design, if you are lucky, the computer will simply make the stitches smaller. The same number of stitches will fit into an area, the design may be heavier and not lay flat. This is the first sign that you shrunk the design too much.
c.) Your top thread tension is too loose.
- You really want to get this thread to stop breaking and so you’ve dropped the thread tension as far as you can justify right? Well, your thread might not be breaking, but your top thread is now covering the back side of the fabric. This method of preventing thread breaking will result in a heavier and more rigid design.
Oh Shit #4: My thread won’t stop breaking!!
For some people, this is the #1 indicator that they have a thread tension problem. Everything else is fine. Their designs lay down flat, they have never had a snare, and if this thread would just stop breaking everything would be fine!!!
Start by reading “For the Love of Thread“. If that doesn’t solve your problem then hopefully I can address the issue here.
This is a tricky area. It is generally a combination between thread tension and thread quality. You are trying to balance the two, but there may be no happy place in between.
~ Step #1 but not really…
If you have gotten this far then this isn’t step #1 but I have no good name for it. This is the step which you have been avoiding the whole time. Take the machine to a shop. If somehow your bottom thread tension has been changed, or was never really well balanced to begin with then you need a trained repair person to get that bottom tension back to where it needs to be.
There are how to guides online to balance the bottom thread yourself. If you feel brave enough to give it a shot then good luck.
If it were my machine and I had the money… I would take it to the repair shop with the thread that will not stop breaking. Ask the person if it is the machine or the thread. Once they have rebalanced the thread tension, you shouldn’t have any more issues. If you do, read on to step #2.
Step #2
The repair shop has given you a clean bill of health. Congrats 😊
But your thread is still breaking Damn It!
I’m making some assumptions here:
- This isn’t happening with all of your threads, just one or two outliers
- You for some reason desperately want to get this thread working with no respect for love or money.
- Once this gods forsaken project is over this thread is going in the GARBAGE!!!
If these assumptions are wrong, then go back to step #1 because the shop needs to give you a refund.
If my assumptions are correct then we just need to baby it through this one project.
- Start by dropping your thread tension so that is moves very easily through the machine.
- Drop your speed to about the second slowest setting
- Pinch the thread just before it goes into the thread tensioner
- Tension the thread by feel as it goes into the tensioner.
- Using your other hand hold the fabric stable on the Z plane as the machine moves the fabric on the X,Y planes.
These practices should get you through the layer/design. It isn’t fun, your arm will go numb, and I recommend throwing that thread out after you are done.
Oh Shit #5: Why isn’t the top thread laying down flat?
This is a weird one and I have ZERO pics from when it happened to me. Basically the top thread had left loops above the design. I think it was a combination of too low a thread tension, and too high a machine speed. It left excess top thread which looked like the soft side of Velcro.
All I could do was go behind and using tweezers pull the bottom thread until the loops were pulled to the back side of the design. This seemed to work and I didn’t see any more issues after I tightened up the top thread further.
Keep Reading about Thread Tension:
10 Tips for Taming the Tension Monster By Debbie Henry
Understanding Thread Tension by Claire Shaeffer

Leave a comment