
This post is the precursor for “How to Get Rid of the Tension Headache Caused by Your Thread Tension”.
Why have yet another informative article about thread when there are a thousand other articles about thread? Heck, there is even a magazine titled “Threads” it has some good articles you should check out 🙂
Why am I redesigning the wheel then? Because when it comes to embroidery there are really only four factors that can change the outcome of your project.
- Your Embroidery Machine (the settings and computer designs)
- Your Fabric (not all fabrics are created equal)
- Your Stabilizer (…reminds me of hair products, you have stabilizers to stiffen the fabric, sticky stabilizer, stabilizer which will let the fabric flex and move easily, water soluble stabilizer so there wont be any stabilizer later, there is even liquid stabilizer…..)
- Your Thread….
Your choice of thread should take up 25% of your concentration. If you are anything like me (living on a fixed income… or a non-existent income) then having a favorite thread brand isn’t really an option. 90% of the thread issues you will encounter can be avoided by finding the thread brand you love and never deviating from it. I repeat, if you don’t want to have to deal with thread breaking, tension issues, and probably broken needles then just pick a reputable brand and never change the settings on your machine again.
There are several very good brands and even more really bad ones. The good brands are expensive, smooth, vibrant, and have a uniform thread thickness throughout the spool/cone. You almost never find them sold as anything other than single spools/cone by the 1000m.
Brands that I have either liked or have had recommended to me:
- Gutterman (mom loves this stuff and wont use anything else)
- DMC embroidery thread (was recommended by Cathi who hand quilts check out her blog here)
As a recently graduated engineer with over 100 thousand dollars in college debt I don’t have the money to go out and buy 60 spools of thread of exceptional quality at $3.99 a spool (not even the cone, those are $5.99). That is a total of $240.00 plus tax. Instead I ordered the Amazon Special which was a convenient $43.99 for 63 cones. That is a whopping savings of 82% and I got three more cones of thread. What isn’t to love? The colors are vibrant, the thread looks strong and even, and it was cheap!!! I wouldn’t know so much about thread if this had a happy ending would I?
Background: This Amazon special contained 63 cones of Brother thread 1000m per cone. I’ve used the thread in about six complete projects (one incomplete). I have learned many lessons, read the end of the post for a list.
If you are like me and you impulse buy or sale shop at your local craft store (Joann’s, Sally’s, etc) then continue reading. If you are one of the blessed (love you mom) and can afford to stick with one quality brand then please continue to enjoy your embroidering experience. Everyone else knows what is coming…
Oh Shit #1
My thread is unraveling during my project!
Well this one was a surprise. I was neck deep in a large project involving throw pillows and a beautiful Japanese dragon with cherry blossoms. When low and behold something didn’t look right… the thread looked too thin, and the stitches weren’t covering the same area as before.
I stopped the machine and noticed the second most horrifying thing I could imagine. Two out of the three strands of the thread had snapped. The machine hadn’t detected a thing and continued on for at least two dozen stitches. Only a single strand of thread was still in the needle, the other two were getting tangled inside the tensioner inside the sewing arm.
I imagine the last strand would have snapped sooner or later, but I hate to think of the damage to the tensioner if it had gone on much longer.
WTF?:
What the heck was going on? Well the short answer is that I had found a thin spot. A point in the 3 strand thread which was thinner than the rest. Because the thread is 3 strand, it looks nice and even. However those strands are not nice and even. The needle, tensioner, or the spool stand could have put just enough tension on the wrong spot to break one or two of the strands of the thread without breaking all three. When it got to the needle, the remaining strand went trough the eye, but the other two did not. This could have ended with a bent or broken needle or even a jammed tensioner.
Solution:
If you have run into this then all you really can do is back up until you reach unaffected stitches. Re-thread the entire top thread. Then continue on. I recommend dropping your speed to reduce stress on the thread. Watch your project like a hawk until complete because it may happen again.
Oh Shit #2
My thread keeps breaking!
If your thread breaks more than once an hour then you have a thread breaking issue. This can be because of a few issues.
- Your tension is set too high/too low
- Solution: Please refer to the next post “How to Get Rid of the Tension Headache Caused by Your Thread Tension”.
- Your thread spool/cone stand is not working for you and the thread keeps tangling up and breaking
- Solution: I talked some about spool/cone stands during “10 steps to remedy Metallic Mayhem” But I said I’d elaborate here.
- I know it still isn’t a complete answer, but as this post is already in excess of 2k words, I’ll write a post about them soon 🙂
- You have the wrong needle for your thread
- Needles and thread go together like engines and breaks. One is useless without the other.
- Solution: Check out this article from Schmetz to understand which needle you should be using with your thread and material.
- You are running your machine too fast
- Solution a: If you are working on a section that has three layers of thread already in place then you MUST slow down!!! Thread breaks here are common because there isn’t much room between threads for the needle to push through and the thread can break easily as the needle forces it’s way through.
- Solution b: Use a pair of tweezers or bent pliers to hold the fabric down to the base of the machine. As the needle is pulled up during these thick sections, the fabric will pull up with the needle. This is a common area for thread breaking. If you can keep the fabric down, the needle can move more smoothly and will have less stress on the thread.
- Something in your machine has gone screwy
- Solution: Read Oh Shit #3
- Low quality thread
- Solution: We have gone over this right? Sometimes the thread is just crummy thread. If you can’t for the love of all that is holy get this thread to stop breaking then throw it out. Sometimes the universe is telling us that we need to move on.
Oh Shit #3
My needles keep bending/breaking and I think something is wrong with my machine now!
This is indicated by a scratchy sound while the machine is running. Can also be accompanied by thread breaking or snarls in the bobbin case.
You thought this was all about thread right? Well, sometimes the thread can damage the machine. Maybe you have thread fragments in the thread path of the sewing arm, maybe you have fuzz in your bobbin. If the thread becomes tangled the needle can bend. Then when the needle is pushed into the bobbin, it no longer lines up with the bobbin case. I have punched holes into my bobbin case. These holes do not help matters.
Solution:
If you start hearing sounds that shouldn’t be there, start by cleaning your machine.
- Clean/oil your machine
- Embroidery projects can have up to 100,000 stitches in a complex design. Please treat your machine with kindness. Try to clean and oil your machine about every 100,000 stitches or every six weeks. Think of it like an oil change for your car. If you don’t, then metal will rub against metal and bearings will -wear out. Don’t know how? If you own a Singer XL-400 series Check this youtube out.
- Remove the bobbin case and follow along with this youtube video to clean and inspect for damage. (once again it is for the Singer XL-400 series but I’m sure if you googled something similar for your machine you will find something)
- If damaged, replace your bobbin case with singer approved parts. Don’t order the amazon cheapo…. I tried this, it lasted a month.
- Here is a good place to order them from.
- As of the writing of this blog I don’t get money for my recommendations (it would be nice if I was wouldn’t it?)
- Here is a good place to order them from.
- If damaged, replace your bobbin case with singer approved parts. Don’t order the amazon cheapo…. I tried this, it lasted a month.
- Recenter the needle arm
- Your needle arm can swing right to left. make sure it is centered
- Make sure your needle can do full motion without hitting any moving parts
- Use the wheel on the right top of the machine and go through a few full cycles. Make sure to end with the needle in the top position.
- Replace your needle
- If none of this helps, have your machine serviced by a reputable repair shop.
Note: If you do any repairs or maintenance during a project, always power off the embroidery machine before restarting your project.
Oh Shit #4
I have run out of my thread and can’t find more anywhere!
So, the throw pillow project. The project where I had to buy an additional 3 yards of fabric (the project originally was only 3 yards of fabric….) This project burned through most of my stabilizer, the majority of my patience, and all of my hot pink thread. Brother etp 085. I tried buying more to finish the last three panels. One organization wouldn’t ship to the USA, another wanted $27.00 per cone! None of the equivalents looked all that great and I had another two colors that were running out fast (thankfully I was able to finish with what I had). I finally found one that you could only tell was different if you saw it in the right/wrong light. I then mixed the remaining thread that I had left and only used the replacement color in back ground layers which could give the illusion of “depth”. I managed it.
A big deterrent for embroidery is that you have to have a large supply of colors to be able to do a range of projects. It is expensive to purchase and if you live in a small apartment it takes up a lot of space. I have a thread case and a wall mounted thread display to hold my embroidery thread and I have an entire drawer to hold all of my serger thread. This doesn’t count my every day I need to hem my pants thread. Add in the bobbins and it is no wonder there is an entire industry out there just for organizing thread.
This brings us to a major problem though, what do we do when our favorite brand stops selling the color we need? What if you want to pick a color scheme before you order all of your thread for a project? How do you decide when you don’t have the spools in front of you? What do we do when we run out?
Solutions:
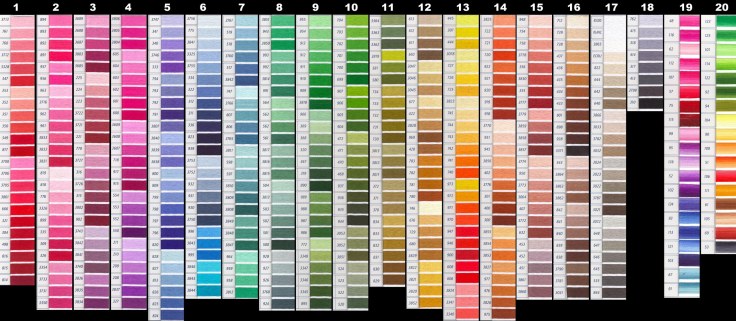
What I suggest if you are limited on space/funds and you still want to plan and execute a project is to follow a color guide. They are available all over the net, this guide will show you tons of colors, and will give you the thread code for multiple brands. This way if you have the money for a quality thread you know which colors you want for your project and you can gradually grow your collection. .
Here is a color chart for the DMC thread (mentioned above as a pretty good thread)
If you do end up with the amazon special or a supply of embroidery thread of unknown origins from some relative that found out you started embroidering, I advise you to only use those threads on small projects. A large project would be any project which is in excess of 50,000 stitches. The wide selection at hand has it’s advantages, you can do a last minute project and have that birthday gift ready in six hours. It might look a little uncoordinated, but it still goes pretty well. Just don’t do a project that will take you a month and you will be implementing multiple hoops and multiple designs. When you run out of that color, things will start to look patchy and uncoordinated.
Finally if the worst has happened and you are out of the color you need and you cannot find it anywhere. Follow the color guides, try and match your color with the color guides and find the closest match. Like what I did, you may be able to finagle a decent match by playing the layers game. This only works if you have some of your original color left though, so when you see that you’re running low that is the time to find more or do a color match.
A list of color guides that I have trusted in the past is from needlepointers.com
Lessons Learned
I said I’d add a section here about lessons learned when using TUO (Thread of Unknown Origin) and here it is.
Lesson #1: Only do small projects if you don’t have an established supplier for the color of thread you are about to use.
Lesson #2: Always thread your machine with the pressure foot up. This is a must for any thread.
Lesson #3: Stabilizer may not be your friend, but it might be that teacher who stayed after school to tutor you until you passed math class. Respect it and appreciate that it might be a pain in the butt, but it will support you and help you achieve your dreams.
Lesson #4: Slow down, this isn’t a race and the faster you go, the more mistakes you will have to correct in the long run.
Lesson #5: New needles can be frustrating, but often times, the mere act of replacing the needle and re-threading the sewing arm can fix whatever problem you have been struggling with.
As always good luck. Remember to post in the comments if you find any other problems. The more we share, the more we know. It will take all of us working together to keep our craft alive.
