It’s beautiful, dazzling, and a bitch to work with. Why? Why is something so beautiful so much hassle? If you are anything like me, you bought some pretty, shiny metallic thread of unknown brand, unknown quality, and you have no earthly idea what the heck it is made of. You haven’t bothered to read up on the hows, the whys, or the whens of METALLICS.
By now most of you have already encountered the Oh Shit. If you haven’t, then check out the trusted links page for a link to a page that might fill you in on how to avoid these problems.
There are two Oh Shit scenarios but multiple causes for your headaches. Before we get started I’m going to give you a list of things you should check before you continue. This is mostly to ensure that you are in a good starting point and that you aren’t fighting your machine.
Step #1: Is your machine clean? Have you dusted and oiled your machine in the past six weeks? Do so now. Metallic thread is a special occasion and a clean embroidery machine is one less problem to worry about.
Step #2: What kind of bobbin thread are you using? In my experience, do not use metallic thread in your bobbin. Metallic thread in the bobbin will add unnecessary thickness to your design and will add an additional breaking point that will trip you up. I recommend using a standard polyester or nylon bobbin thread of either black or white (whichever matches your fabric best). Most machine embroidery thread is rayon because the rayon takes the vibrant colors that we love so much, but isn’t as strong as polyester or nylon. That is why the rayon thread is bulkier and breaks more often.
Step #3: The needle. Metallic thread needs a metallic embroidery needle. Here is a link to Amazon to order some 🙂 Metallic needles are specifically designed to work with metallic thread, not fabric. The eye hole is larger, has rounded edges, and is less likely to break the thread. A new, clean needle is always your best bet. If you are having a needle breaking issue, that is a whole different ball game. Check back and I’ll try to have something up soon on the hows & whys of needle breaking.
Step #4: If you haven’t already, re-thread your machine. It is annoying but more problems have been resolved by re-threading than any other solution. This is the unplug/plugin equivalent for an embroidery machine.
Step #5: Drop your stitching speed. Metallic thread is delicate, the faster you ask your machine to move, the more friction is on the thread and the more likely you will hit either oh shit #1 or #2.
If you think that thread tension has something to do with your problem, then you are probably right. Thread tension is the #1 problem I have had with metallic thread. I will go into this in more detail at the end of this post because you can write a book on the intricacy of thread tension.
Oh Shit #1:
The constant and eternal agony of breaking thread. If your thread is breaking more than once an hour then you have a thread breaking issue.
What could be causing this issue?
~ Wrong or old needle, hopefully by now you have checked this.
~ Thread Tension (see the end of the post)
~ How your thread is rolling off the spool. (wait–really?!)
How is your thread rolling off of the spool? For any thread breaking issue which isn’t tension or needle related, either the spool isn’t rotating smoothly (which is causing the thread to tangle around the spool and break) or the spool isn’t spinning and the thread is developing a twist.
I have invested in do-dads and dongles to try to get a spool to roll smoothly and evenly without the jerky spasmodic movements which lead to the thread tangling and locking up around the spool. I’ve tried the Pinterest methods (the foam pea-nut, the thread webbing, etc); most of these methods have had limited success but none of them resolved the issue until I bought a basic stand up spool stand (Check it out here).
This wonderful stand stopped the tangles but of course started a second issue. As the thread unwound from my now stable spool the spiral from the spool began to build up in the thread. Some day I will write something about thread breaking and point out how this affects all thread, but today will focus on how this is especially bad for metallic thread. When metallic thread twists, it crimps. This weakens the thread and if the twist gets into the tensioner or into the needle, the thread will snare and break.
The Solution:
I wish there was just one. The resolution would be a spool that released the thread at exactly the same speed as the machine used it. As this does not exist, I have some rules I follow. And if any of you know where to find such a device please let me know.
~ Rule #1: Slow down. I never put my machine over half speed, with metallics I go to quarter speed.
~ Rule #2: Get a good spool stand. If you are working with a cone, keep it vertical. If you are working with a spool, have a horizontal spool feeder and do not go over the top of the spool. I’ve tried The Thread Director Specialty Thread Spool Pin Adapter but I didn’t have any success because either the caps were loose enough that thread was able to go over the cap of the spool or the caps were on so tight that the spool couldn’t spin freely and the thread broke. I’ve mostly used cones since that debacle.
~ Rule #3: Nothing is as accurate as your finger tips. If all else fails, I use my fingers to maintain even and constant tension on the thread through the whole layer. Sometimes I don’t have to, but if I am doing anything with a satin stitch I will hold the thread and tension the thread before it hits the tensioner.
~Rule #4: If you see a twist forming, hold the thread at the spool/cone and wait until the twist is fully gone before allowing more thread to leave the spool. If the thread coming off the spool = the thread entering the machine, there will be no twists.
Oh Shit #2:
The Snare…. We have all seen it, the snare between the bobbin and the fabric. That hellish place where the hoop won’t move and you can’t see under your fabric but you know.
The snare is a classic thread tension problem. The top thread is so loose that the bobbin thread isn’t even moving. When I see a snare I have a standard operating procedure. This works with my Singer XL-420, it might not work for those machines which have an on board computer.
~ Step #1: Gently cut the fabric free.
~ Step #2: Remove the hoop and remove any loose stitches from your design.
~ Step #3: Dismantle the bobbin case. Clean everything, inspect for damage.
~ Step #4: Replace the needle. The hoop was trying to move, the needle had excess tension on it, it probably bent. Reassemble and re-thread bobbin.
~ Step #5: Re-thread top thread with the pressure foot in the up position! The most likely tension issue you are facing is that you threaded the machine with the pressure foot in the down position. If you did then the thread was NOT in the tensioner at all and you had no control over your tension thread.
~ Step #6: Return your hoop to the machine
~ Step #7: Turn the embroidery machine off. OMG!!! Right, you just lost your position in the layer! You’ve already lost the position. If you try to just re-thread and continue from here the rest of your design will be out of alignment from where you started. You must restart your machine so that the embroidery arm can return to its factory settings.
~ Step #8: Resend the layer from your computer to the machine.

~ Step #9: Fast forward to the point where the snare started (or at least to the last functioning stitch. Sometimes that is stitch #1) How? On the Singer XL-420 Look at the two buttons above the start button on your sewing arm. The second button from the top is the fast forward button, the one just below is the reverse button. If you press the fast forward and hold until you hear a beep, the machine will continuously fast forward until you push the start/stop button. Check your Owners Manual for your specific instructions.
~ Step #10: Holy Shit this took forever right? you have finally gotten back to where you were before the SNARE FROM ALL HELL. At this point most of us are lamenting “Why would I ever want to use metallic thread ever again?!” Hang in there, you almost have it working again. Hold the end thread securely and start your machine. Keep it slow and only increase the speed once you are sure the tensioner is engaging properly.
Oh Shit #2 take 2:
It didn’t work… the miraculous ten step program didn’t work and it Snared again! Or you just have a loose looking stitch that isn’t laying quite flat. This means you actually have a thread tension problem. Your problem here is that there are two types of metallic thread. For one type, you use very low tension. For the other, you want to increase your tension.
How can you tell? Metallic thread is made one of two ways, either it is solid metallic core thread or it is a metallic sheath over a rayon core. The “high quality metallic thread” is mostly the solid core thread which breaks very easily. For these you want to use very low top tension (All the way down to #1). They are easier to use because they don’t unravel the way the rayon core thread does. Most of what you will find is the metallic sheath over the rayon core thread. With this thread you actually want to slightly increase your thread tension to about midway between the Sew Setting (S) and the Embroidery Setting (E). Play with the tension here. If you see the bobbin thread showing on top then your tension is too high and you want to lower it until the top thread is all you see. Follow steps 1 – 10 to get back to a good starting point and continue with your designs.
Helpful Hints:
In this article I want to add a few things to watch out for when playing with metallic threads:
#1: Satin Stitch will almost inevitably Snare. I’ve done lots of satin stitches but every single time I have had at least 1 snare. I don’t know why, I don’t know how. I follow my own rules, but something about that satin stitch just lowers the tension so much that the thread takes off. Be ready for a fight if you choose to do a metallic on a satin stitch.
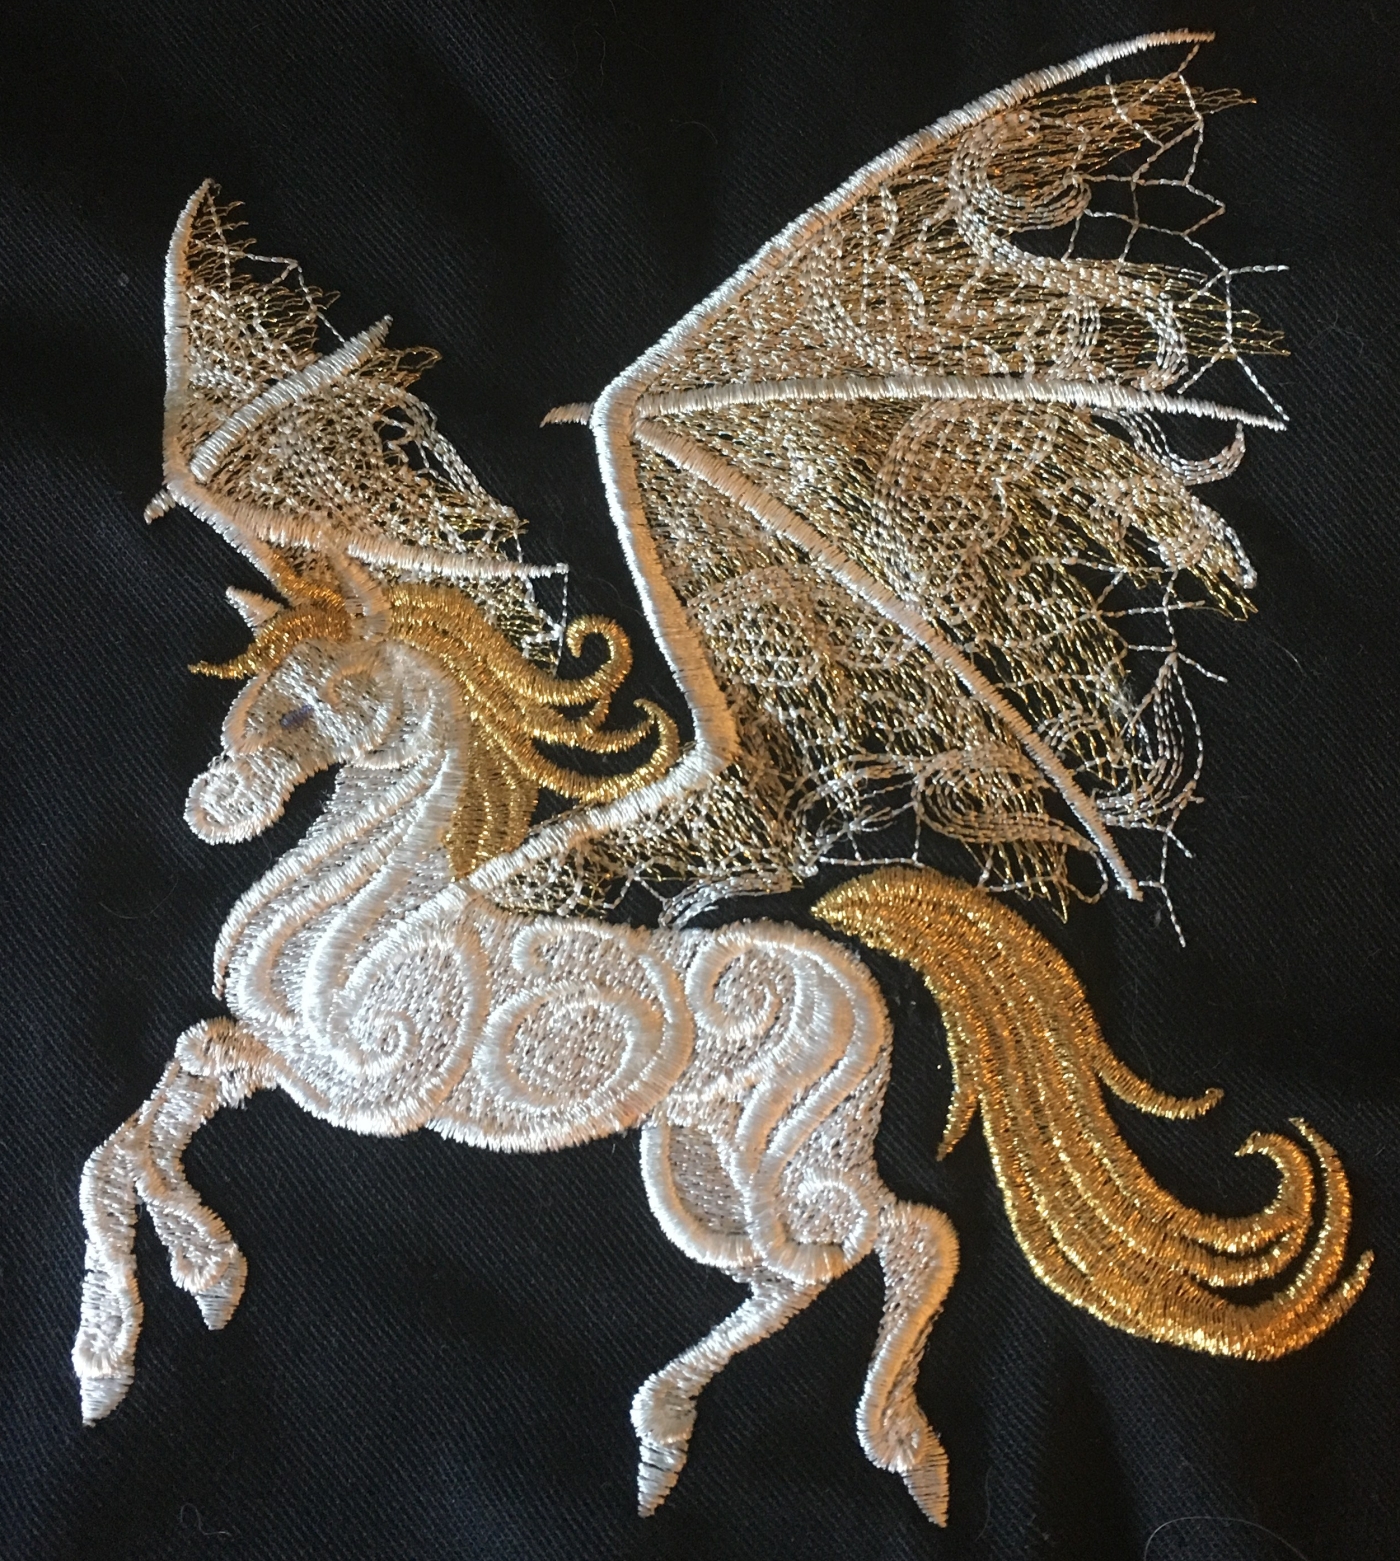
#2: Metallics look amazing if you are using them as accent layers. Look at the image at the top, really look at it, the mane and tail of the Pegasus is metallic, but so are the wings. The wings were 3 layers. First I laid down the gold metallic sub layer, then a white mid layer, and finally the white satin stitch top layer. And the wings glitter like diamonds. Using Metallics in layers works great. I’ve never had a metallic thread snare during an even layer.
#3: Use metallics sparingly. I’ve seen some metallic nightmares. Metallics of all different colors and hombre. Your metallic thread is so special because only one or two accents are shiny. If you have a massive design which is all mostly one color, layer in metallics with regular embroidery thread. That way the design won’t be crunchy and gaudy.
#4: Stabilize your work. Remember to use high density stabilizer when working with metallics. Metallic thread is heavy, if you don’t support your work, it will simply sag.
Well, that is it. I have spent the past four hours writing the sum of my knowledge so far about how to work with metallic threads. I hope it didn’t take you as long to read it as it took to write. Good luck. If you learn any new tricks, pass them along. This community is all about helping each other out. We are all amazing artists and our craft needs to be shared to survive.

Nicole, the snare happened to me a long time ago; after which my stash of metallic threads remains unused. Thank you for these great tips! Everything is that much more clear now. You’ve inspired me to break out the metallics…..
Great post.
LikeLiked by 1 person
Thanks! I really appreciate your feedback. Let me know how your next metallic project goes. I’ve been using them for a while now, but something new always happens to surprise me and I need to keep learning to stay ahead of the gremlins.
LikeLike